How to set up a hotmail system.
This guide will take you through the setup of a "hotmail" system, from start to completion. The process is broken down into nice bite size chunks, so you won't get technological indigestion. In addition, we have included an overview of the complete system and information on several NT and Unix utilities, which enable you to check that everything is running correctly once you have put it together.
A hotmail system is a way for people to use email via the web.
In order to provide a hotmail service, you need to setup a number of components which will work together. These include standard email services and web interfaces to them. You may also want to allow users to create their own accounts online. You may want to provide a number of domains or virtual domains. You may wish to allow other people to administer particular domains. This can all be provided by the NetWin suite of products. You may already have some components of the complete system, and may just want to add a web interface to them. Provided that they obey the relevant standards, this should also be possible.
First, let's review what your hotmail system needs to include:
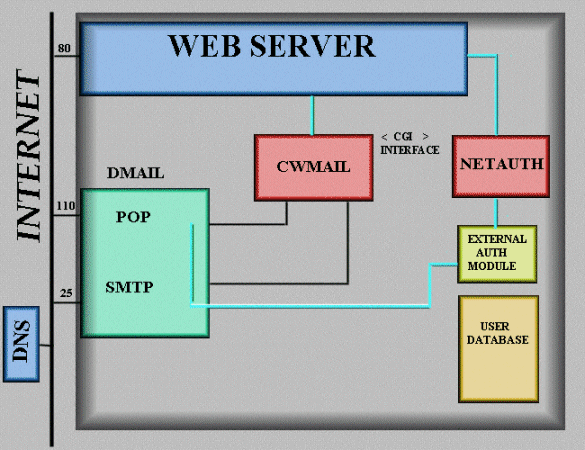
You can create a hotmail system with one domain or multiple domains. A simple system might look like this:
On the left is the outside world (the internet) and a domain name server. On the right, inside the large box, is everything in your machine or server. Normal access to web mail will be provided via your web server, although direct connections to the email services can also be made from a traditional email client. Inside your server you have a web server, two cgi's (CWMail and Netauth), POP and SMTP servers and a database of some type containing usernames and passwords.
Let's just follow through the sequence of events when someone in the
outside world sends an email to someone on your hotmail system, and then gets a reply:
John, on some other system, is going to send a message to Sue, who
has an account on your web mail system:
John creates a short message and addresses it to sue@yourplace.com and presses send on his email client.
His client software connects to his local SMTP server and gives it the message. It uses a DNS mail lookup in order to find out where email for yourplace.com should be sent. The DNS server gives his SMTP server the IP address of your machine. The two SMTP servers connect on port 25
Your SMTP server first checks that it has a user Sue. In order to do this, it checks the user database via and external authentication module. It then accepts the email for Sue and appends it to Sue's drop file.
Sue sits at her friend's computer, opens a browser and connects to http://yourplace.com/scripts/cwmail.exe Again, a DNS lookup is used to find your machine. Her web browser connects to your webserver on port 80. Your webserver starts up cwmail.exe as a subprocess, gives it the request and waits for it to return a web page in html.
CWMail provides a login page requesting username and password. This gets sent to the webserver and then through to the web browser. CWMail.exe then closes down.
Sue fills in her username and password and presses the login button. Again, this is sent to your webserver and then to cwmail.
CWMail connects to the POP server in order to verify account details and see if there is any new mail for her.
The POP server checks the user database to make sure password is correct and then checks for a drop file containing email messages which are passed to CWMail
CWMail passes them back to the web server, then to the web browser. Sue selects a message, reads the message and types a reply. (There are several interactions between the browser, the web server and the cgi to do this)
The reply is sent to CWMail which connects to your SMTP server and gives it the reply for John
Your SMTP server uses a DNS lookup in order to find out where John is, and sends the message to his SMTP server.
This description of a simple interchange between two people probably makes it clear that there are quite a number of components talking to each other on your behalf. In order for them to work properly, they all need setting up and need to be using the same authentication method and the same usernames etc. So now we need to look at how to install and/or setup each of these components:
| Component | Options |
|---|---|
| DNS | External give them records to insert for you. Run your own, put your own records in. |
| Webserver | Apache, Peer Web Services, ... Lots of these. Many good free ones. |
| POP Server | DPOP...QPOP, other third party poppers |
| SMTP Server | DSMTP.... QMail, other third party smtp people. |
| WebMail Interface | CWMail, DMailWeb, WebMail, other third party systems |
| User/Password database | NT users, Unix users, Netwin's NWAuth, LDAP server, SQL database... |
There are many possibilities and options in setting up each of these components. In order to provide a simple concrete example, the next section makes a number of assumptions and works through the setup of each component. The following sections provide more detail on each component and an outline of some of the other options available.
Contents
In order to set up a basic system, you will need to follow steps 2, 3, and 4 above. They will take you through the setup of DMail, CWMail and NetAuth, creating one email domain. Once completed, you can use step 5 in order to add virtual domains to your mail system.
The very first step in any email system is the setup of DNS entries. You have probably already seen to this if you have a permanent connection to the internet. If you have registered a domain name for your machine, say myplace.com, then you just have to check that there is also an MX record in the appropriate DNS to ensure that email for anyone@myplace.com will come to your machine. Just ask the person who gave you your domain name if this has been or can be done. If you need more detail on setting up these DNS entries, look at section 6 and get this underway before starting on section 2.
There are also two other informational sections - 7 and 8 . They briefly describe two utilities which come with most operating systems: telnet and nslookup. These are both very useful when you need to test each section individually in order to track down a problem.
The easiest way to set DMail up is to concentrate on the host domain first and add virtual mail domains later, the procedure explained below will explain how to set DMail up for external authentication for use with NetAuth, creating a hotmail type system.
Step 1 - Installation.
Go to our DMail download page https://netwinsite.com/dmail/download.htm
and download the distribution set for DMail for your system. On NT it is a
self extracting archive which will start the installation procedure for you. On Unix you
will need to uncompress and untar it, and then run the setup program.
Install DMail, following the onscreen instructions in the
installation program. This will set DMail up for standard use, no external authentication
and one domain.
Step 2 - Add external authentication
In order to add external authentication to DMail you need to edit the
configuration file. You can do this in two ways - using the DMAdmin GUI provided with the
windows version of DMail, or editing the dmail.conf file yourself. I am going to
explain how to edit the file yourself, because this is the only way to configure DMail on a
Unix system, and it is very straight forward.
Open the dmail.conf file, it should be found in the system directory on
your server (/etc or \WinNT\system32). Find the line "authent_method" and change
it's value from "nt_user" or "unix_user" to "external".
Add authent_process setting and set it to "\dmail\nwauth.exe"
(Windows) or "/usr/local/dmail/nwauth" (Unix), this is the external
authentication process called NWAuth and is found in the DMail installation directory.
Add authent_domain setting and set it to "true" This setting
instructs DMail to lookup users using domain name, and allows you to add virtual domains
later on. If you do not set this to true, addition of virtual domains later on becomes tricky.
While you are here, look for the host_domain setting and remember it's
value, because you will need it in step 4.
Step 3 - Reload configuration
You now need to reload the mail server so that it is running
with the new configuration. Go to the system prompt and type "tellpop reload"
and "tellsmtp reload". You may need to go to the DMail directory first before
these commands will execute.
Setup of DMail should now be complete for use with one mail domain. Continue with the setup of CWMail and/or NetAuth before reading the "'Adding a virtual domain'" section.
3. Setting up CWMail / Dmailweb.
Again, simply go to our download site https://netwinsite.com/dmailweb/download.htm and download the distribution set for your system. On NT it is a self extracting archive which will run the install program for you. On Unix you will have to uncompress and untar it, and then run the WMSetup program.
The installation program provided should install CWMail or DMailWeb without problems. Once it has finished you should be able to connect to http://your.domain/scripts/cwmail.exe or dmailweb.exe OR http://your.domains/cgi-bin/cwmail.cgi or dmailweb.cgi. You should see a login page.
Again, just go to our download site https://netwinsite.com/netauth/download.htm and download the distribution set for your system. On NT it is a self extracting archive which will run the install program for you. On Unix you will have to uncompress and untar it, and then run the nasetup program.
The installation program provided should install NetAuth without problems. Once finished, you should be able to connect to http://your.domain/scripts/netauth.exe OR http://your.domains/cgi-bin/netauth.cgi. You should see the check username page, where users can find out whether the username they want is free or already taken.
To test the NetAuth, try adding a user. In order to do this, enter the desired username "test" into the username field on the first page (the check page). Clicking 'check' continues. Assuming that this is the first user ever created, the username should be free and you should be given another page (the add page). The name "test" should be entered for you into the username field, all you need to do is enter a password and click 'add'. The user should be added and you should be given a confirmation page. If you receive a page with an error, consult the NetAuth manual or contact us here at support-netauth@netwinsite.com.
With your new user, attempt to log into CWMail. In order to do this, connect to http://your.domain/scripts/cwmail.exe or dmailweb.exe OR http://your.domains/cgi-bin/cwmail.cgi or dmailweb.cgi. You should see a login page. Enter the username "test" and your password and click 'login'. The login should proceed with no errors, and you should see a first time user page asking for your details. If an error page is returned, consult the CWMail manual or contact us here at support-cwmail@netwinsite.com.
Once you have NetAuth creating users, and these users logging into CWMail, you are ready to add a virtual mail domain. In order to do this you will need to add settings to dmail.conf, netauth.ini and cwmail.ini. It may be a good idea to ensure that you have backup copies of these files. NetAuth and CWMail have already created backups for you in their templates directories. You may want to update these backups when you have everything working correctly.
Remember to modify the .ini files in the web server directory as these are the live copies.
Step 1 - Dmail.conf
"vdomain" is the name of the setting which adds a
virtual mail domain, it has this format
vdomain <prefix> <suffix or IP number / name> <domain name> <drop path>
As we are creating virtual domains and are verifying with domain
names (authent_domain true), we do not need to worry about the prefix setting, instead
the "suffix / IP number" setting is important.
If you have more than one IP number and want to have each domain on a
separate IP number then you are creating "IP based virtual domains". Otherwise,
you are creating "suffix based virtual domains".
Here are examples of suffix based vdomain lines.
vdomain d2 /domain2 mail.domain2.com \dmail\in
vdomain d2 /dom2 mail.domain2.com /usr/local/dmail/in/2
Here are examples of IP based vdomain lines.
vdomain d2 1.2.3.4 mail.domain2.com \dmail\in
vdomain d2 2.3.4.5 mail.domain2.com /usr/local/dmail/in/2
Of course, the actual suffix or IP value will differ, depending on your system and the IP numbers you have available.
Now you are ready to add a vdomain line to dmail.conf, open it and find the "host_domain" setting. I would enter my vdomain lines near this setting, this will make more sense to read later on, but makes no difference to DMail at all. You can add as many vdomain lines as you like, and are only limited in the case of IP based domains, by the IP numbers you have available. You may not add two vdomains with the same IP number or, likewise, two vdomains with the same suffix.
So now add a vdomain line, and remember the suffix or IP number for that domain as well as the domain name. If you are using a suffix, it is recommended that you use a separator character as the first character of the suffix. In my examples I have used a '/'. You could use an '@' symbol or another character, but the '/' is recommended.
Step 2 - Reload configuration
You now need to reload the mail server so that it is running
with the new configuration. Go to the system prompt and type "tellpop reload"
and "tellsmtp reload". You may need to go to the DMail directory first before
these commands will execute.
Step 3 - Cwmail.ini
After adding your vdomain line(s), you will need to tell CWMail about
the domains. In order to do this, use vhost lines in the cwmail.ini file. The way CWMail handles
virtual mail domains is that it can tell what the URL in the browser is, and each URL
matches with a different virtual mail domain. For example.. www.main.com is the URL to the host domain and www.domain2.com is the URL to the first virtual domain
you have added, you need a vhost line like this... "vhost www.domain2.com".
Vhosts work in sections, CWMail matches the URL to a vhost line and
will then load the settings contained therein until it reads another vhost line or it
reads the vend line. Once it has read the vend line it goes back to loading settings
normally. So an example ini file may be...
[cwmail.ini]
templates \cwmail
pophost 1.2.3.4
smtphost 1.2.3.4
vhost www.domain2.com
pophost 2.3.4.5
vhost www.domain3.com
pophost 3.4.5.6
templates \cwmail\3
vend
nwimg /nwimg
In this case, the ini file can be loaded in three different ways. If
the URL is "www.domain2.com" then the
templates pophost and smtphost is loaded then pophost is changed to "2.3.4.5"
and then nwimg setting is loaded, if URL is "www.domain3.com"
then the same occurs only pophost is "3.4.5.6" and templates is
"\cwmail\3". If the URL is anything else, the vhost sections are ignored.
CWMail gets the URL from the SERVER_NAME environment variable.
Sometimes this variable is not set to the expected value and, if you find you vhost
sections are not being loaded, you may need to try another environment variable. To tell
CWMail to use another environment variable, set the vhost_match setting to the name of
this variable, like "HTTP_HOST" which can also return the URL host.
You can put any settings you like into a vhost section and these
variables will either replace or add to previous settings. In the case of the templates
setting, the new value replaces the old one, but in the case of the body_add setting, the
new value is added to the list of values.
Now you will need to add a vhost section to match the new virtual domain added above. If you are using suffix based domains, the vhost section will need to contain a suffix value (the same value that you used in the vdomain line above). If using IP based domains then a pophost, and smtphost settings with the new IP number are required. Also, remember to include a domain setting in the vhost section stating the new virtual domain name, this should match the domain name from the vdomain line.
Step 4 - Netauth.ini
NetAuth also uses vhost sections in order to set up virtual domains. It does
this in the same way as CWMail, and also uses the vhost_match setting if required.
You will need to add a vhost section to match the new virtual domain. If using suffix based virtual domains, you will need a suffix setting. Unlike CWMail early versions of NetAuth, NetAuth (version 3.0e and earlier) use two settings for the suffix. "suffix" and "suffix_seperator". The suffix setting is the same as the value used in the vdomain line minus the separator character, and suffix_seperator is the separator character which defaults to '/'. You do not need to set it unless you have used another character in the vdomain line. Later version's (Netauth 4.0+) suffix setting will be the same as Cwmail's suffix setting. If you are using IP based virtual domains, you will need to specify a new pophost setting with the new IP number, this is identical to CWMail. Remember to include a domain setting in the vhost section stating the new virtual domain name. This should match the domain name from the vdomain line.
6. DNS Entries, MX entries and A records
DNS management requires two name servers - a primary and a secondary. This is because the InterNIC will not grant you a domain name unless there are at least two DNS servers on the Internet with information about that domain. Another good reason is that if you only have one and it goes down, users will be cut off from the internet. This gives you three options for DNS management, they are...
In order to do this, you must inform your ISP that it is providing both primary and secondary DNS services for you. If they are unable to or do not wish to do this, you will have to use option 2. The next step is to inform the ISP of the DNS records which you want to publish, to allow interaction with your network. In addition, you will need MX records if you want to receive mail at that domain and A records for your ftp and www server(s). You will need to inform your ISP of these addresses also.
There are several reasons for running your own DNS server, they include...
- Your ISP will not allow you access to theirs, or does not have one.
- You own a part of the internet (namespace).
- If you are running IP network-based applications inside your network that require users to connect to internal machines by name, and you don't want to advertise the names and/or addresses of these machines to possible hackers.
- You want full control, your own DNS server means that you can make immediate changes. You do not have to wait while your ISP changes things for you.
You will need to purchase DNS software. As most servers are run on Unix machines, the most popular software is BIND (Berkeley Internet Name Domain), you will find software and training in DNS management here.
This option has many of the same principles as option 2. And there are two more choices here..
- You manage the primary name server.
- You manage the secondary name server.
If you choose to manage the primary name server yourself, keep in mind that you will have to maintain the DNS records.
If you choose to have a secondary name server onsite, then your ISP will still do all of the work, and your server will simply download the data about your domain from the primary server periodically.
Two types of DNS record are MX Records (for mail delivery) and A Records (used to resolve computer names to IP numbers).
MX Records, or Mail Exchange records, are used to allow mail delivery. They are in this format...
<domain_name> <machine_with_mail_server> <preference>
i.e. An MX record might contain
netwinsite.com netwin.co.nz 0;
netwinsite.com mail.netwin.co.nz 1;
netwinsite.com mail3.netwin.co.nz 2;
In this example, mail delivery would be to netwin.co.nz first, because it has the lowest
preference value. If this fails then to mail.netwin.co.nz, and finally to
mail3.netwin.co.nz.
'A' records associate computer names with their actual IP address. They are in this form...
<computer_name> <address>
i.e. An A record might be
netwin.co.nz 1.2.3.4
In this example, the DNS server will locate netwin.co.nz and use the IP 1.2.3.4 to locate
the machine.
You require A records for all the machines mentioned in MX records, all machines where you wish to use ftp (File Transfer Protocol) and all machines running a www (World Wide Web) server.
Telnet is a utility provided with both NT and Unix systems. It allows you to connect directly to IP addresses on any port. With this utility we can check...
Basic operation of telnet
Telnet differs a little from the windows system to Unix, there are two sections describing it's use, one for windows and one for Unix.
Windows - Telnet
In order to execute telnet, type "telnet" at the command prompt or click 'Start', 'run' and type "telnet". You should be presented with a window titled "Telnet -(none)" this is Telnet. In order to connect to a machine, simply open the 'Connect' menu and choose 'Remote System'. You will be presented another window containing three fields, 'Host name', 'Port' and 'Term type'. The 'Host name' is the name or IP number of the machine you wish to connect to. The 'Port' field is the port number which you wish to connect to on that machine. Ports include '23' telnet port, '25' smtp port, and '110' pop port, and there are several others. Once connected, you can type data directly to the port and receive replies. This provides an excellent way of ensuring that things are functioning as they should.
Unix - Telnet
In order to execute telnet, type "telnet" at the command prompt. You will then be presented with a 'telnet>' prompt type "?" and it will display it's list of available commands. In order to connect to a machine, type "open <machine> <port>", where <machine> is the IP number or name of the machine, and <port> is the port you wish to connect on. Ports include '23' telnet port, '25' smtp port, and '110' pop port, and there are several others. Once connected, you can type data directly to the port and receive replies. This provides an excellent way of ensuring that things are functioning as they should.
In order to check the various ports on your system you will need to know a little about how each port works. The following is a brief explanation of how to talk to the pop port.
The pop port is used to check / receive / delete mail from the mail server. It is port
number 110. There are several commands that can be used while logged into the pop server,
but first you must log into pop.
In order to do this, type "user <username>", <enter>, "pass
<password>", <enter>. Of course this requires an existing user and
correct password. Once logged in you can use these commands.
| Command | Example | What it does? |
| list | list | The list command lists a user's email. It lists them with a reference number which can be used to retrieve / delete the message. This reference number only lasts until you log out, and a different message may recieve that reference number next time. |
| uidl | uidl | This uidl commands lists messages by their UID (Unique ID) number. This is useful because this number, unlike the reference number above, never changes (once allocated) until the message is deleted. |
| retr | retr 1 | The retr command retrieves the contents of message with the given reference number, in this example message 1. |
| dele | dele 1 | The dele command deletes the message with the given reference number, in this example message 1. |
| top | top 1 10 | The top command retrieves the top x lines of the message with the given reference number, in this example top 10 lines of message 1. |
| quit | quit | This commands disconnects you from the pop server. |
Nslookup is a utility that looks up DNS entries. It is the easiest way to check whether your DNS entries are correct. This utility differs very little between operating systems, so one set of instructions should suffice.
In order to execute nslookup, type "nslookup" and press enter.
You should see something like this...
| Default Server : ns-100Mb.webpros.com Address : 206.127.192.1 > |
There is a list of help on nslookup commands. In order to get this list, type "?" and
press enter.
Otherwise, you can simply type the domain name into the prompt and press enter in order to search
for it.
| Default Server: ns-100Mb.webpros.com Address: 206.127.192.1 >netwinsite.com |
You can also search for MX records...
| Default Server: ns-100Mb.webpros.com Address: 206.127.192.1 >set type=MX |