Basic Installation
Thankyou for choosing WebMail as your Web Based Mail Client. WebMail works with a Mail Server that uses POP3 or IMAP4 and a Webserver. If you don't already have these, then consider our SurgeMail package, which includes these and WebMail.
 
A PDF version of the WebMail manual can be downloaded from: webmail_pdf_manual.zip
 
If you have any questions, please consult the FAQ Page first.
 
If you need to know more about any aspect of WebMail, please Email:
 
support-webmail@netwinsite.com
Overview
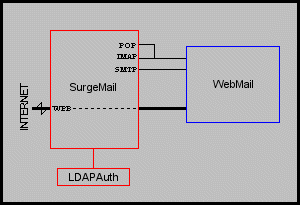
WebMail is a Web based Email Client, which means that your users only need access to a web browser to access their Email. They do not need to do any extra installation or setup of their mail account.
 
This allows your users to connect from anywhere in the world, using any computer, including public terminals in Internet Cafe's, not only allowing them to use WebMail as their main mail client but also read/send emails while on holiday.
 
The diagram below shows an example of the overall view of where WebMail fits into a mail server system. In this example the user information is stored in an LDAP database.
 
SurgeMail: Which is Netwin's Mail Server, which has a built in POP,IMAP,SMTP and Web Servers.
LDAPAuth: This is one authentication module you can use to interface with your database of users. There are many other authentication modules that you can use. To see the list see the URL: https://netwinsite.com/authent/


Windows Installation
Note: The Installation instructions are intended to help create an absolutely basic install of WebMail. For a more standard installation use the Install program included in the distribution.
 
Either:
Run the program install.exe

Or:
To install WebMail you must copy the webmail.exe and webmail.ini files to your CGI directory on your WEB server.
 
Your WEB server should have a CGI directory setup. This directory is where CGI's are installed and run. This varies from web server to web server. Below are some common locations:
 
"\FrontPage Webs\Content\cgi-bin"
or c:\inetpub\scripts
or \SERVER_ROOT\CGI-bin

You should read your web server documentation if you don't currently know how to setup a CGI directory.
 
Note: The CGI directory should have execute rights only. It should not have read rights.
 
The next step is to setup a templates directory anywhere on your system.
e.g.    c:\webmail
First copy all the files from tpl\common to each of the other tpl\NAME directories.
Copy all the files from the 'tpl\NAME' directory from the distribution set into this directory. These files have the Extension '.tpl'. There are also some other data files that have the extension '.dat'.
 
Next copy all the files from img/common to each of the other img\NAME directories. Then there are the images to be copied. Currently, the default templates presume that the images are in a relative directory '/nwimg/mail' on the web server.

ie. Physical directory:            
    c:\inetpub\wwwroot\nwimg\mail
     \SERVER_ROOT\html\nwimg\mail

Example:

download the self extracting archive from netwinsite
webmail30l.exe # Unzip the self extracting archive to witemp
cd \wmtemp # Change to temporary unpack directory

mkdir \webmail
mkdir \webmail\panel
mkdir \webmail\masterset
mkdir \webmail\masterset\surge
mkdir \webmail\masterset\smooth

# Create a directory for templates


mkdir \inetpub\wwwroot\nwimg

# Create a directory for image files

mkdir \inetpub\wwwroot\nwimg\mail
mkdir \inetpub\wwwroot\nwimg\mail\panel
mkdir \inetpub\wwwroot\nwimg\mail\surge
mkdir \inetpub\wwwroot\nwimg\mail\smooth

# Create a directory for image files
copy webmail.exe "\inetpub\scripts" # Copy CGI
copy webmail.ini "\inetpub\scripts" # Copy ini
copy tpl\common\* \webmail\panel # Copy common template files to each template directory
copy tpl\common\* \webmail\masterset\surge
copy tpl\common\* \webmail\masterset\smooth
copy tpl\* \webmail
# Copy docs templates etc to destination

copy img\common\* \inetpub\wwwroot\nwimg\mail\panel
# Copy common image files to each image directory
copy img\common\* \inetpub\wwwroot\nwimg\mail\surge
copy img\common\* \inetpub\wwwroot\nwimg\mail\smooth
copy img\* \inetpub\wwwroot\nwimg\mail # Copy image files
del \witemp # Clean out temporary directory

Note: webmail.ini file must be in the CGI-bin directory with webmail.exe

Unix Installaion
Note: The Installation instructions are intended to help create an absolute basic install of WebMail. For a more standard installation use the Install program included in the distribution.
 

Once you have downloaded the distribution set you have to uncompress and untar it.

uncompress webmail10h.tar.Z # Uncompress tar file
tar -xvf webmail10h.tar # Extract distribution files to WebMail
# sub-directory
CD WebMail # Change to temporary WebMail sub-directory

Either:

run the Install program:
./install

Or:

To install WebMail you must copy the webmail.cgi and webmail.ini files to your CGI directory on your WEB server.

Your WEB server should have a CGI directory setup. This directory is where CGI's are installed and run. This varies from web server to web server. Below are some common locations:

        /home/httpd/CGI-bin
    or /usr/www/CGI-bin
        etc.

You should read your web server documentation if you don't currently know how to setup a CGI directory.

Note: The CGI directory should have execute rights only. It should not have read rights.

The next step is to setup a templates directory anywhere on your system.

eg.    /var/spool/webmail

First copy all the files from tpl/common to each of the other tpl/NAME directories.
Then copy all the files from the directory 'tpl/NAME' from the distribution into this directory. These files have the extension '.tpl'. There are also some other data files that have the extension '.dat'.

Next copy all the files from img/common to each of the other img/NAME directories. Then there are the images to be copied. The default templates currently presume that the images are in a relative directory '/nwimg/mail' on the web server.

ie. Physical directory:            
     /home/httpd/html/nwimg/mail
     /usr/www/public_html/nwimg/mail

The next step is to ensure that WebMail will run with the correct ownership. When you set up the CGI directory on your system you should have to set an ownership setting that web browser will run CGI's under.

e.g.    nobody

The CGI, ini and the template directory (and template files) that you created MUST all be the same ownership, and set to something like 'nobody'

Note: On Apache, the correct owner is specified in your httpd.conf file. The default is normally 'nobody:nobody' but can be different.


Example:

After uncompressing and un-tarring the archive.
CD \webmail # Change to temporary unpack directory

mkdir /var/spool/webmail
mkdir /var/spool/webmail/panel
mkdir /var/spool/webmail/masterset/surge
mkdir /var/spool/webmail/masterset/smooth

# Create a directory for templates

mkdir /home/httpd/html/nwimg
# Create a directory for image files
mkdir /home/httpd/html/nwimg/mail
mkdir /home/httpd/html/nwimg/mail/panel
mkdir /home/httpd/html/nwimg/mail/surge
mkdir /home/httpd/html/nwimg/mail/smooth
# Create a directory for image files
cp webmail.CGI /home/httpd/CGI-bin/ # Copy CGI
cp webmail.ini /home/httpd/CGI-bin/ # Copy ini
cp tpl/common/* /var/spool/webmail/panel # Copy common template files to each template directory
cp tp/common/* /var/spool/webmail/masterset/surge
cp tpl/common/* /var/spool/webmail/masterset/surge
cp tpl/* /var/spool/webmail # Copy docs templates etc to destination

cp img/common/* /home/httpd/html/nwimg/mail/panel
# Copy common image files to each image directory
cp img/common/* /home/httpd/html/nwimg/mail/surge
cp img/common/* /home/httpd/html/nwimg/mail/smooth
cp img/* /home/httpd/html/nwimg/mail # Copy image files
chown nobody /home/httpd/CGI-bin/webmail* # Change Ownership of
chown nobody /var/spool/webmail # WebMail and template
chown -R nobody /var/spool/webmail/* # files.

Note: the webmail.ini file must be in the CGI directory with the webmail.exe file

Remote FTP Installation

You can do an installation to a hosting server even if you have only FTP access, although it is easier if you have telnet access too. Also, you must be allowed to run cgi scripts on your host. You'll have to check your service agreement or contact your host admin to find out the details of this for your host.

It is recommended that you first install WebMail on a local machine so you can get a feel for where the directories should go and get your config file setup the way you want.

If you have telnet access to your host and access to a cgi-bin directory on the host then you can just copy the WebMail download up on to your site, expand the archive and run the install script.

If you have less access than this you will have to do a manual install. It is essential to set up WebMail on a local system first to make this process manageable.

There are a number of aspects to consider:

  • Webmail.cgi and webmail.ini files. These files should go in your cgi-bin directory. If you don't have direct access to this yourself you might have to ask your hosts administrator to put them there for you. Make sure you get all the settings in your webmail.ini right before you ask your admin to put them up. They probably won't mind the second or third time, but if you ask them to put up webmail.ini after every one of your 15 changes they might not look on you so favourably.
  • Nwimg directory. This directory contains all the images and static HTML pages loaded by the pages WebMail displays. This directory must be in a normal webserver HTML directory. It's just like any other web pages. The kind you have probably setup before. The nwimg setting in your webmail.ini file should contain the relative url to your nwimg directory. ie, if you can view your nwimg directory in a web browser by going to http://your.domain/webmail/nwimg then your nwimg line in your webmail.ini should say:
        nwimg /webmail/nwimg
    Copy all the files from the nwimg directory on your local system to the nwimg directory on your host.
  • Workarea and templates directories. These directories store WebMail's user files and the templates for the pages WebMail displays. These directories should be in a standard system directory that is accessable by webmail.cgi. Ideally they should not be accessable from the web, as this will mean that people can browse your users files using a web browser. If you have to put your workarea inside your webserver html directories then WebMail will still work fine but you should be aware that user files will be visible to anyone who cares to look at them. The workarea and templates settings in your webmail.ini file should simply give the system directory being used. eg.
        templates /usr/imauser/webmail/templates
        workarea /usr/imauser/webmail/users
    Copy all the files from your templates and workarea directories on your local machine to the respective directories on your host.
  • Other webmail.ini settings. There are a few other settings worth mentioning. Your domain setting should be the bit that comes after the @ sign in your email addresses. eg, if your addresses are user@fish.com then your domain setting should be:
        domain fish.com
    You also have to specify the URL of your smtp server, and pop or imap server. You might put lines like this into your webmail.ini file:
        smtphost smtp.mydomain.com
        pophost pop.mydomain.com
    or perhaps:
        smtphost www.mydomain.com
        imaphost www.mydomain.com